Showing posts with label DIY. Show all posts

Sunday, June 28, 2015

Organization & Garage Painting

This has been a crazy month - we had our first anniversary, went on vacation, and I just finished my first summer class of the year! I don't have a lot to update on house-wise but I wanted to show some cute pics of what we've done lately.

The first thing I was excited about was some organization I got done. I found a bunch of bins at Target to organize the minor holiday decor. (I already have red and green totes for Christmas and an orange and black one for Halloween!)


Then I went to Hobby Lobby and picked up a pack of cute patterned paper tags and a pack of white tags that are slightly smaller to paste on the front to create cute labels!


Husband decided he didn't like our garage walls. The back wall is shown below and the side walls were just bare wood - you can slightly see it on the left side of the photo next to the bicycles. The black part is where a garage door to the backyard would go if we decide to put one in.


He decided to make the garage one of his summer projects and I have to admit, it does look a lot better with a coat of paint!


I've also done a lot of cleaning out our clothes that we don't wear and/or don't fit, and I dropped a humongous bag of clothes and shoes off at the thrift store already, with two more bags in the closet to be dropped this week! Husband asked if I'm getting rid of clothes to appease the thrift store gods so I can continue to get good deals ;) hey, it's not a bad idea...

Tuesday, June 9, 2015

Pinterest Win

I went thrifting this weekend with a good friend and found a ton of stuff! I'll post my second haul video at the end of this post - it's things for husband and my nephew rather than for myself this time around!


Anyways, I bought a few shirts for myself, including this super soft, loose, brand-new shirt from Kohl's. I tried it on and debated about it for a while but ultimately decided to get it. So as I always do, I stuck all the clothes in the washer immediately when I got home. After it all came out of the dryer, I noticed the tag of doom on my brand-new shirt:


dry clean only.


TRAGEDY. I tried the shirt on and it had shrunk in length a good 3-4 inches and was now tight instead of loose. UGH. So I took to Pinterest and found a bunch of pins that recommended soaking the shirt in hair conditioner and lukewarm water, then stretching it out on a towel to the size it should be and letting it air dry.


So I filled the sink, pumped a ton of conditioner in, and let the shirt soak for about 15 minutes. I felt like I wasn't doing much good when I was stretching it out, so after about 10 minutes of stretching, husband was like "I think that's as good as it's going to get..." It dried overnight and it actually worked! It's not the shape it was originally, but it's definitely longer and a little looser. Plus it smells really good. (Thanks, Pantene!) I really don't know what to do with it now, though. Can I wash it again? I definitely won't be drying it in the dryer, and I hope it's washer-safe... This is why I don't buy nice things.


Wednesday, May 27, 2015

Green Thumb?

I decided that I need a garden this year. Our yard is not very conducive for planting in the ground, so I decided that a raised bed would be the best option. So we headed to Lowe's!

We got three 2x6x8 boards, one of which we cut in half. This would be the border for the bed itself! We also got some wire mesh to put on the bottom of the bed to keep out the moles. After a stop at a local nursery for some dirt, we were ready to go!


Husband did most of the building for me and he did a great job! We placed one half of the cut board on each end and screwed that together first.


Then we laid the wire mesh out and stapled it to the frame. The worst part was cutting off the excess!


We flipped it over and filled with dirt - done!


The Pinterest tutorial I followed recommended stakes in each corner to keep it from shifting, but our dirt was so hard that we couldn't get stakes in the ground further than about an inch. The bed is fairly close to the house, so I was hoping it wouldn't shift too much. We've had some flooding here the last couple of weeks but the bed hasn't gone anywhere yet!

I don't like your typical "garden" vegetables (cucumbers, tomatoes, peppers...) and I only planted what I like and what I cook with. We have lettuce, onions, carrots, broccoli, and green beans. I got these cute little signs at the nursery when we got the dirt and you can write whatever you want on them!


I planted about a week and a half ago, and we already have some little sprouts!

On a less successful note... I also planted blackberries and strawberries about a month, month and a half ago.


We also planted this pretty lily.


I took this as the "before" picture, and they all still look exactly the same. I don't think I'll be getting my strawberries and blackberries! :( The lily was pretty for about a day, then we had a tornado warning and the wind ripped all of the flowers right off the stems. Sad day.


Fingers crossed that my vegetables do better than my fruit and flowers!

Tuesday, May 12, 2015

Wedding Card Book

We got so many beautiful cards for our wedding and I couldn't stand to just put them in a box and never look at them again, so I decided to make an album of cards!

I went to Michael's and picked up this little album, a two-pack of pearl flourishes, some decorative letters, and a hole punch.


I started punching each card and quickly discovered that I could only punch your standard greeting card, and the more extravagant cards were impossible for me to punch through. So I went back to Michael's and got a heavy-duty hole punch. Problem solved!


The front of album #1.


The pearl flourish!


The album only held one-third of our cards, so back to Michael's I went. Luckily, the same albums were buy one get one free, and I needed two, so I was a pretty happy girl!

Album #2:


Album #3:


I would recommend this project for wedding cards, graduation cards, shower cards, or any cards that you want to keep organized in a cute place! 

Sunday, October 26, 2014

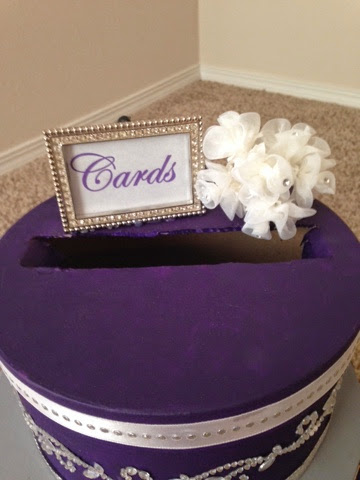
DIY Card Box

We're taking the DIY posts back a few months to a wedding DIY project. This was one of my Pinterest finds and I had so much fun making it - luckily, my mom was on hand to help make it look just right :) I turned on Netflix and went to it!

First I loaded up on supplies. The base of the box is made from this set of three paper mache boxes:

From Hobby Lobby - it came as a set of three but were not already attached.

I also picked up some purple and grey craft paint, two spools of silver ribbon, a jeweled silver frame, two jewel flourish decals, some loose rhinestones, a small bunch of white flowers, a jeweled "D", and a white bridal hair clip. {I wish I had started blogging again pre-wedding so I would have a more accurate photo walkthrough of how I made this!}

I absolutely love these paper mache boxes. They were super easy to cut and only took two coats of paint to cover! First, I painted each box. Next, I hot glued the base of the small box to the lid of the medium box and the base of the medium box to the lid of the large box. I wanted it all one piece but didn't want the entire thing to be hot glued together, just in case it needed to be disassembled :) Once the glue was dry, I cut a large hole in the bottom of the small and medium boxes, leaving about an inch left on the rims so that there was still enough for the bottom and lid to be glued together, but would allow the cards to fall through to the bottom.


The slot for the cards at the top was the hardest part - good thing my mom helped me out with that part :) she also got the little "cards" sign printed and in the frame. I thought it would look too bare with just the frame on top, and I love how the little bunch of flowers looks next to the frame!


I used one large flourish for the small box. The ribbon for the tops of the boxes was white with silver rhinestones, while the ribbon for the bottoms was all silver and sparkly.


I applied ribbon to the lid and base of each box, which stuck for a few days and then started to slide off - ignore my ugly hot glue attempt to fix the top ribbon! My mom had to fix that one for me too :)  I used two large flourishes to surround the "D". They're actually the same flourish - Hobby Lobby didn't have two that were mirror images, so I just turned one upside down. I think it turned out cute! 


The large white bridal hair clip got its clip removed and was hot glued to the center box. I freehanded the rhinestones in a pattern around each side of the flower.


So that's my card box! Except for the ugly hot glue part on the front {which I hope no one noticed :) } I couldn't be happier with how it turned out. The whole project took about two hours {and I'm pretty sure this was one of my post-tonsillectomy projects when I was going stir-crazy from being off work for two weeks but didn't feel up to going anywhere} and cost around $35 - less than the cost of buying a similar one on Etsy, and more personal than one you would buy at Hobby Lobby. I loved the idea of a tall card box, although I think the current trend of using a birdcage or old trunk is also super cute! It's a downer to think about, but I was also concerned that someone not affiliated with the wedding could easily access our reception and make off with the card box since it's guaranteed to have money in it, and I wanted one that would be easy to spot if someone were to take it or even try to take it apart. 

I have absolutely no idea what I'm going to do with it now. I don't have the heart to throw it away so it will probably sit in our basement for years and years unless someone gives me a repurposing idea!

Totally irrelevant side note: Taylor Swift's new album dropped about an hour and a half ago and I am addicted! It's definitely different than her first three albums but as an avid supporter of artists like Katy Perry and Britney Spears, I definitely dig the pop sound. Then again, I absolutely adore Taylor Swift and everything she does, so I may be a little biased :)

Also totally irrelevant side side note: I had my first "getting my husband out of bed because I heard a scary noise outside" moment. And I am still hearing these noises. This is why I want a dog. A very large, protective dog...

Monday, September 1, 2014

The Crafty Wife Continues

I have so many craft projects in progress but here are two I want to share! 

When we were on our honeymoon, I brought back some sand for my shadow box and had a ton left over. I didn't have the heart to throw it away so I made a stop at Hobby Lobby and picked up a glass jar, stick-on letters, and some ribbon. I love how the final product turned out, although I'm not sure the ribbon will stay the way it is right now - maybe a bow? I think this will be super cute in our bathroom. 

It's hard to get a good shot of the front because the jar is small, but you get the idea.


Next project is probably the one I was most excited for! I'd been looking for a shelf to display my figurines and miniatures but didn't want to pay upwards of $30 for one on Etsy. I looked at TJ Maxx, Ross, Burlington, and similar stores with no luck. I ran to the flea market on my lunch one day and found this beauty for only $8! I snapped it up right away. 


I wasn't a fan of the original wood, though. I stopped at Hobby Lobby again {they really need a frequent buyer card...} and picked up two bottles of paint for about $1 each. Two coats later, and this lovely shelf has a whole new life - for a third of the cost of one I would have purchased online!


Once I get more crafts completed, you'll be seeing more crafty posts from this girl! I'm working on one that I posted about here and my next big project will probably involve paint chips. Batten down the hatches, husband, we're getting DIY up in this place!

Friday, August 22, 2014

DIY Plans

We are supposed to close on our house on September 18th and I am so excited to finally put some of my DIY Pinterest pins to use! I will have to see how some of these play out with the layout of the house, but here are my top ideas so far!


Hobby Lobby is just waiting for me to come raid the aisles in search of home projects! I can't wait to get started!

Tuesday, August 12, 2014

The Crafty Wife

As I've said before, I am not terribly crafty, but I more than appreciate those who are. I spent a good part of the weekend browsing Etsy on my phone and I came across something new to me - mini canvases. These are actual little canvases that people paint on! I did not know such a thing existed! I favorited these ombre canvases:

{source}
{source}
I love these and decided I could attempt my own version, even with my limited craftiness. So I made a trip to Hobby Lobby on my lunch break to grab these:


And i got to work! Doing some research online, I saw a lot of recommendations to first cover the canvas with a thin layer of water.


When they say thin, they mean thin. Like, barely damp. I put too much water on a couple of the canvases and it diluted the color a bit too much for my taste.


 Cover 1/3rd of the canvas with your base color, then add a few drops of white and stir.


Cover the next 1/3rd with your white mixture, then add a bunch more white and cover the final 1/3.

The water on the canvas allows the colors to blend together pretty easily. I found that the darker colors (pink and blue) looked a lot better than the lighter colors (teal and yellow). If I did it again, I would choose all dark colors because it's a much bigger difference between the light and the dark. Here's the final product!


The canvases were $5 for a four pack of the 3x3 size and the paints were around $1, bringing the total for this project to a little over $10! I also spent a dollar on a plastic artist's palette to make it easier to mix the colors, but that part is optional. I also only used white to mix the colors but you could also use black to make the colors darker.

I'm definitely not a pro at this so if I can make these cute little ombre canvases, anyone can!

Sunday, August 10, 2014

A Little Joy

I was at Hallmark a few weeks ago buying some thank you cards and they were having a buy three, get one free sale. I didn't need a fourth card and I had a feeling that if I bought a fourth card for a birthday or something, I would end up losing it in our move, so I picked up this sweet little card with the intent of framing it. It's a 5x5 greeting card and I found the frame at Hobby Lobby for about $5, so I think this was a fantastic little bargain! It's sitting on our dresser right now but I can't wait to find it a permanent home if (and when) we move into our house!


Sunday, August 3, 2014

A Blue Shelf

I have ambitions of being a Pinterest-worthy DIYer... however, I was not blessed with the crafty gene. I love reading other people's DIY blogs and getting ideas that maybe, one day, I'll be brave enough to try :) for now, it's small projects for me!

I cleaned out some of my old clothes that I haven't worn in a while and took them to Goodwill, and decided to browse around while I was there. I much prefer antique stores and flea markets, but sometimes you can find some treasures at Goodwill, too! On this day, I found two treasures and I immediately had big plans for them. Here is treasure #1:


A basic wooden shelf. Maybe not exactly the most wonderful find in the world, but it's exactly what I need to hold my Disney figurines and some knick-knacks! Most of my stuff is still in my room at my parents' house since our apartment is too small for me to move in all of my things. It's all in boxes or just sitting on top of my old dresser (which will not be coming to live with us) so I need somewhere to store my tchotchkes.

I nabbed this shelf for $4 - definitely cheaper than buying a set of shelves from Target (which is probably where most of our house decor will come from as I am completely addicted to Target). I took it home and husband and I made a stop at Walmart the next day to get some sandpaper and paint for it.

It was a bit challenging to sand in some areas so I had to have some muscle ;)
I didn't notice this when I was in the store, but it looks like it was handmade in 1974! I'm glad I can give this piece a new life and a new home :) I insisted to husband that we not paint over the back of this shelf to preserve the writing.
I opted for a bright, cheery blue - something to give a pop of color in the room! This is after one coat.
We let it dry overnight and husband put on the second coat while I was at work the next day - love that man! This is the finished product. 
I love that it's a happy color without being too bright. I think it turned out just fabulously and I can't wait to incorporate it into our home.... wherever that will be! The whole project cost around $7 - and I still have some paint left over for my Goodwill treasure #2, which will be the subject of a future post!

Friday, August 1, 2014

Printable Pretties

I discovered the joy of printables when I was planning our wedding - they're cute, you can personalize them, and they're some of the most affordable decor pieces around! 

We opted to not have ushers and displayed this sign outside of the entrance to the sanctuary
{shop link here}

This is one of my favorites - one that I bought for the wedding but with the intention of hanging it in our home!
{shop link here}
So when we heard that we'd gotten the house we wanted, my thoughts immediately turned to the decor. I blame Pinterest for this. I love displaying pieces that are special, sentimental, or unique to us, so I instantly started looking up printables on Etsy. [For anyone who doesn't know how they work, you purchase the digital file from the Etsy seller and then print it yourself. The digital files usually run from $1-$5, and the cost of printing is equally as cheap - I think Walgreens does an 8x10 for around $2.] My Etsy favorites are almost entirely composed of printables that I will purchase to fill in decor gaps around the house! Here are some that I can't wait to hang:

{link}
{link}
{link}
This is from Walt Disney's Disneyland opening day speech - I think it will be perfect inside of our front door or on a living room wall!
link
So far, my finds are about 50% Disney-related, 40% scripture-related, and 10% random cute phrases. My goal is to do a gallery wall somewhere in the house and I know I will need some words to balance out the photos - at least, that's what Pinterest tells me. I'm thinking along the lines of one of these:


I'll post updates when I get it hung up!